Contents |
|
|
|
|
|
|
|
|
|
|
|
|
|
|
|
|
|
|
In the chapters on graphical output and events, we already encountered a number of components (panel, canvas, button) that can be used in Java applications with a graphical user interface. We also learned about layouts for arranging these components. We will first examine the most important components for inputting and outputting text .
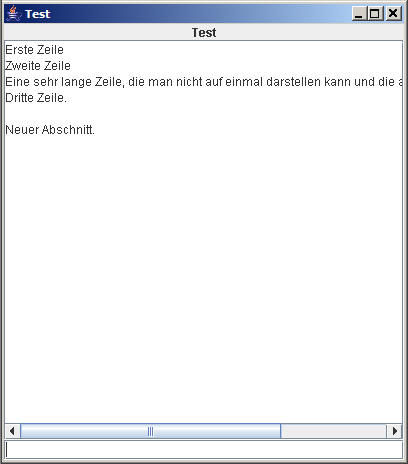
The component for displaying static text is called JLabel . The text can be set either using the constructor or the setText method . A label is always single-line.
The component that allows the user to input and output single-line text is `JTextField` . Text input is handled in the same way as with a label. You can make the `JTextField` non-editable to display only the text. However, you usually want the user to be able to modify the displayed text. In that case, you can simply retrieve the text using ` getText` . A `JTextField` can also generate an ActionEvent when the user presses the Enter key.
To input and output multi-line text, you use a JTextArea . Unlike a JTextField , this method doesn't generate an event when the Enter key is pressed; instead, it creates a new paragraph. However, this behavior can be changed. Typically, you don't use events from these components but instead evaluate the content, for example, when a button is pressed.
To enable scrolling within the text, we use a JScrollPane . This is a component that can hold a JTextField and displays scrollbars when necessary.
In this program, the text area is not made editable. However, all entries in the text field are appended to the existing text there.
import java.awt.BorderLayout;
import java.awt.Dimension;
import java.awt.event.ActionEvent;
import java.awt.event.ActionListener;

import javax.swing.JFrame;
import javax.swing.JLabel;
import javax.swing.JScrollPane;
import javax.swing.JTextArea;
import javax.swing.JTextField;

class TestFrame extends JFrame
        implements ActionListener
{
    JTextArea textarea;
    JTextField textfield;

    public TestFrame()
    {
        super("Test");
        this.setDefaultCloseOperation(JFrame.EXIT_ON_CLOSE);

        setLayout(new BorderLayout());
        setSize(500, 400);

        // Label:
        add("North", new JLabel("Test", JLabel.CENTER));

        // TextArea:
        textarea = new JTextArea();
        JScrollPane OutP = new JScrollPane(textarea);
        add("Center", OutP);
        OutP.setPreferredSize(new Dimension(400, 400));
        textarea.setEditable(false);

        // TextField:
        add("South", textfield = new JTextField());
        textfield.addActionListener(this);

        pack();
        setLocationRelativeTo(null);
        setVisible(true);
    }

    @Override
    public void actionPerformed (ActionEvent e)
    {
        if (e.getSource() == textfield) // enter in TextField
        {
            textarea.append(textfield.getText() + "\n");
            textfield.setText("");
        }
    }
}

public class Test
{
    public static void main (String args[])
    {
        new TestFrame();
    }
}
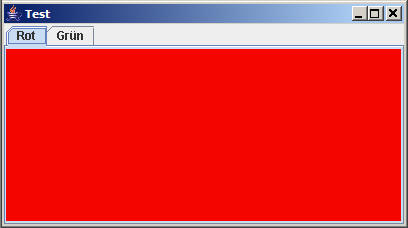
Here we will discuss two layout variations that can be modified by the user.

JSplitPlaneThis creates a vertically or horizontally split view, where the user can actively move the division. The container therefore contains two components. Their minimum size determines how far the slider can be moved to the right or left. We therefore set the minimum size of ours Canvasto 10 by 10 pixels. It's also important to note that the remaining space between the components is distributed. We want an equal distribution and therefore set the distribution weight to 0.5.
import java.awt.BorderLayout;
import java.awt.Canvas;
import java.awt.Color;
import java.awt.Dimension;
import java.awt.Graphics;

import javax.swing.JFrame;
import javax.swing.JPanel;
import javax.swing.JSplitPane;

/**
 * A canvas that is filled with paint.
 */
class TestCanvas extends Canvas
{
    Color C;

    public TestCanvas (Color c)
    {
        C = c;
        setMinimumSize(new Dimension(10, 10));
    }

    @Override
    public void paint (Graphics g)
    {
        Dimension d = getSize();
        g.setColor(C);
        g.fillRect(0, 0, d.width, d.height);
    }
}

/**
 * This is a panel with two horizontal color fields. The user can...
 * Postpone separation.
 */
class TestPanel extends JPanel
{
    public TestPanel ()
    {
        setPreferredSize(new Dimension(400, 200));

        // Create a split pane with two color fields:
        JSplitPane pane = new JSplitPane(
                JSplitPane.HORIZONTAL_SPLIT,
                new TestCanvas(Color.RED),
                new TestCanvas(Color.GREEN));
        pane.setResizeWeight(0.5);

        // Add in the middle:
        setLayout(new BorderLayout());
        add("Center", pane);
    }
}

public class Test extends JFrame
{
    public Test()
    {
        super("Test");
        setDefaultCloseOperation(JFrame.EXIT_ON_CLOSE);

        add("Center", new TestPanel());

        pack();
        setLocationRelativeTo(null);
        setVisible(true);
    }

    public static void main (String args[])
    {
        new Test();
    }
}
The other way to fit multiple components into a small space is JTabbedPane...
To do this, we simply need to change the code as follows.
JTabbedPane pane=new JTabbedPane();
pane.add("Red",new TestCanvas(Color.RED));
pane.add("Green",new TestCanvas(Color.GREEN));
There is also the option of using icons instead of text and tooltips (text that appears when the mouse hovers over the tab).
Often, you want to let the user choose from several options. This is where drop-down menus come in JComboBox. When a user clicks a drop-down menu, a list of options opens. If the user selects one, an event is ActionEventtriggered. In the following program, we capture this event and display the result in a label.
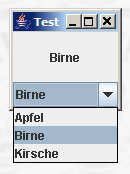
The JComboBox class is generic and you can specify the type of elements. We are using strings here.
import java.awt.BorderLayout;
import java.awt.Dimension;
import java.awt.event.ActionEvent;
import java.awt.event.ActionListener;

import javax.swing.JComboBox;
import javax.swing.JFrame;
import javax.swing.JLabel;

public class Test extends JFrame
        implements ActionListener
{
    JLabel label;
    JComboBox<String> box;

    String strings[] =
    { "apple", "pear", "cherry" };

    public Test()
    {
        super("Test");
        setDefaultCloseOperation(JFrame.EXIT_ON_CLOSE);

        label = new JLabel("", JLabel.CENTER);
        label.setPreferredSize(new Dimension(100, 50));

        box = new JComboBox<String>(strings);
        box.addActionListener(this);

        setLayout(new BorderLayout());
        add("Center", label);
        add("South", box);

        pack();
        setLocationRelativeTo(null);
        setVisible(true);
    }

    @Override
    public void actionPerformed (ActionEvent e)
    {
        if (e.getSource() == box)
        {
            if (box.getSelectedIndex() >= -1)
            {
                label.setText(box.getSelectedItem().toString());
            }
        }
    }

    public static void main (String args[])
    {
        new Test();
    }
}
You can query the selected index or the selected object that you toStringcan convert. Of course, you can also set the selection via the program. Further details can be found in the documentation.
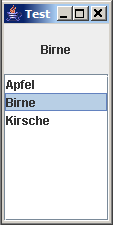
To display all options simultaneously, there is JLista new component. This new component generates an event of type `select` ListSelectionEvent. Therefore, a different package must be included. In the following program, we also embed the list with scrollbars that would appear if the list were too long.
import java.awt.BorderLayout;
import java.awt.Dimension;

import javax.swing.JFrame;
import javax.swing.JLabel;
import javax.swing.JList;
import javax.swing.JScrollPane;
import javax.swing.event.ListSelectionEvent;
import javax.swing.event.ListSelectionListener;

public class Test extends JFrame
        implements ListSelectionListener
{
    JLabel label;
    JList<String> list;

    String strings[] =
    { "apple", "pear", "cherry" };

    public Test()
    {
        super("Test");
        setDefaultCloseOperation(JFrame.EXIT_ON_CLOSE);

        label = new JLabel("", JLabel.CENTER);
        label.setPreferredSize(new Dimension(100, 50));
        list = new JList<String>(strings);
        list.addListSelectionListener(this);

        setLayout(new BorderLayout());
        add("Center", label);
        add("South", new JScrollPane(list));

        pack();
        setLocationRelativeTo(null);
        setVisible(true);
    }

    @Override
    public void valueChanged (ListSelectionEvent e)
    {
        if (e.getSource() == list)
        {
            if (list.getSelectedIndex() >= -1)
            {
                label.setText(list.getSelectedValue().toString());
            }
        }
    }

    public static void main (String args[])
    {
        new Test();
    }

}
This refers to the selection menus that appear below the title bar of windows. In addition, Java 1.1 also has popup menus that can appear in the middle of a page.
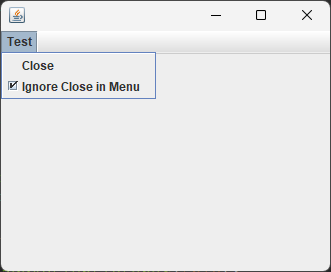
A menu consists of a MenuBar, which contains various Menu objects. Each is a drop-down menu, which in turn contains MenuItem objects that the user can ultimately select. The menu is built in the frame's constructor. The corresponding code snippet looks like this:
// Create menu bar
JMenuBar menu=new JMenuBar()
setMenuBar(menu);
// Create a menu
JMenu files=new JMenu("Files");
menu.add(files);
// Create a menu item within it
JMenuItem ItemClose=new JMenuItem("Close");
ItemClose.setActionListener(this);
files.add(ItemClose);
As you can see, the process is three-stage: menu bar, menu, and menu item. However, you can also nest menus within menus. This creates drop-down menus, as you know them from graphical user interfaces.
In addition to normal JMenuItems , there are also JCheckBoxItems , which receive a checkmark when they are selected.
Pop-up menus are usually triggered by right-clicking on the window. The following program demonstrates the creation of a menu and a pop-up menu. The events of the "Ignore" CheckboxMenuItem used are not intercepted here. Instead, its status is queried as needed.
import java.awt.event.ActionEvent;
import java.awt.event.ActionListener;
import java.awt.event.MouseAdapter;
import java.awt.event.MouseEvent;

import javax.swing.JButton;
import javax.swing.JCheckBoxMenuItem;
import javax.swing.JFrame;
import javax.swing.JMenu;
import javax.swing.JMenuBar;
import javax.swing.JMenuItem;
import javax.swing.JPanel;
import javax.swing.JPopupMenu;
import javax.swing.SwingUtilities;

class TestFrame extends JFrame
        implements ActionListener
{
    JMenuItem close;
    JCheckBoxMenuItem ignore;
    JPopupMenu popup;
    JButton popupclose;

    public TestFrame()
    {
        // build up the menu bar
        JMenuBar m = new JMenuBar();
        setJMenuBar(m);

        JMenu menu = new JMenu("Test"); // first menu
        m.add(menu);

        // a normal menu item
        close = new JMenuItem("Close"); // to item
        close.addActionListener(this);
        menu.add(close);

        // a checkbox item
        menu.add(ignore = new JCheckBoxMenuItem("Ignore Close in Menu"));
        ignore.setState(true);

        // popup menu:
        popup = new JPopupMenu();
        popupclose = new JButton("Close");
        popup.add(popupclose);
        popupclose.addActionListener(this);
        add(popup);

        JPanel panel = new JPanel();
        add("Center", panel);

        panel.addMouseListener( // for the popup menu
                new MouseAdapter()
                {
                    @Override
                    public void mousePressed (MouseEvent e)
                    {
                        if (SwingUtilities.isRightMouseButton(e))
                        // right mouse click
                        {
                            popup.pack();
                            popup.show(e.getComponent(), e.getX(), e.getY());
                        }
                    }
                });

        setSize(600, 600);
        setLocationRelativeTo(null);
        setVisible(true);
    }

    @Override
    public void actionPerformed (ActionEvent e)
    {
        if (e.getSource() == close
                && !ignore.getState())
        {
            dispose();
            System.exit(0);
        }

        else if (e.getSource() == popupclose)
        {
            System.exit(0);
        }
    }
}

public class Test
{
    public static void main (String args[])
    {
        new TestFrame();
    }
}
The pop-up menu is activated via a mouse adapter. It responds to right-clicks. Once displayed, the pop-up menu generates events when the user selects a menu item. It then informs registered listeners about these events, just like the regular menu.
Dialogs are small windows that belong to a frame and are displayed for user input. Examples include yes/no prompts, search and replace, or the file selection dialog.
Dialogues can be modal or non-modal .
Creating a dialog is similar to creating a window. You create an instance of the Dialog class. Then, the dialog must be displayed using `setVisible(true)` . For non-modal dialogs, the program then continues to run normally.
As an example, we'll create a dialog that asks whether the window really should be closed. We'll make the dialog modal, of course.
import java.awt.event.ActionEvent;
import java.awt.event.ActionListener;

import javax.swing.JButton;
import javax.swing.JDialog;
import javax.swing.JFrame;
import javax.swing.JLabel;
import javax.swing.JPanel;

class CloseQuestion extends JDialog
        implements ActionListener
{
    private boolean Yes = false;

    public CloseQuestion (JFrame f)
    {
        super(f, "Close", true);

        // call constructor of dialog with modal-flag true
        // Label for the question:
        add("North", new JLabel("Really close?"));

        // Panel for the yes/no buttons
        JPanel p = new JPanel();
        JButton b;
        p.add(b = new JButton("Yes"));
        b.addActionListener(this);
        p.add(b = new JButton("No"));
        b.addActionListener(this);
        add("South", p);

        // pack set it 100x100 off the frame and show it
        // (blocking the frame)
        pack();
        setLocation(f.getLocation().x + 100, f.getLocation().y + 100);
        setVisible(true);
    }

    @Override
    public void actionPerformed (ActionEvent e)
    {
        if (e.getActionCommand().equals("Yes"))
        // pressed the yes button
        {
            Yes = true;
        }

        dispose(); // frame continues its job
    }

    public boolean isYes () // to ask for the result
    {
        return Yes;
    }
}
There are also pre-built dialogs for entering text or for asking for yes or no. The simplest one displays a message that the user must confirm. It requires a component to display it, usually a JFrame.
JOptionPane.showMessageDialog(this, "Error!");
Another dialog allows single-line input. If the string is zero , the user has aborted the input.
String s = JOptionPane.showInputDialog(this, "Enter Name", "");
As a more complex example of a non-modal dialog, we create a dialog that allows the selection of the active color. The example also demonstrates the handling of scroll bars.
Furthermore, the program demonstrates how objects can communicate with each other. The EventDialog notifies a ColorEditListener of the currently selected color and when the dialog was closed. In our case, the window itself acts as the ColorEditListener. For simplicity, we pass the listener to the dialog's constructor. Ideally, one should write an `addColorEditListener` method and provide for multiple listeners. This will be covered in a future exercise.

Since this example is quite complex, we will describe the most important components again.
![]()
import java.awt.Color;
import java.awt.Dimension;
import java.awt.Frame;
import java.awt.Graphics;
import java.awt.GridLayout;
import java.awt.Panel;
import java.awt.Scrollbar;
import java.awt.event.ActionEvent;
import java.awt.event.ActionListener;
import java.awt.event.AdjustmentEvent;
import java.awt.event.AdjustmentListener;
import java.awt.event.MouseAdapter;
import java.awt.event.MouseEvent;
import java.awt.event.WindowAdapter;
import java.awt.event.WindowEvent;

import javax.swing.JButton;
import javax.swing.JDialog;
import javax.swing.JLabel;
import javax.swing.JPanel;
import javax.swing.UIManager;

/**
 * Interface that is notified by the dialog. This is an elegant way to
 * to communicate between components.
 */
interface ColorEditListener
{
    public void setColor(Color c);

    public void close();
}

/**
 * Horizontal scroll bar for one color.
 */
class ColorScrollbar extends JPanel
        implements AdjustmentListener
{
    public int value;
    ColorEdit colored editor;
    Scrollbar;

    public ColorScrollbar(ColorEdit ce, String s, int value)
    {
        coloreditor = ce;
        this.value = value;

        // The simplest layout with one row and any number of columns.
        setLayout(new GridLayout(1, 0));

        // Label on the left
        add(new JLabel(s));

        // Next to it, the scrollbar with a width of 40
        add(scrollbar = new Scrollbar(Scrollbar.HORIZONTAL, value, 40, 0, 255));

        // The window should be 300x30 cm
        setPreferredSize(new Dimension(300, 30));

        scrollbar.addAdjustmentListener(this);
    }

    /**
     * Event method for the AdjustmentListener
     */
    @Override
    public void adjustmentValueChanged (AdjustmentEvent e)
    {
        value = scrollbar.getValue(); // read new value
        scrollbar.setValue(value); // Fix scrollbar at that location
        colorededitor.setcolor(); // notify the Color Editor
    }

    public int getValue()
    {
        return value;
    }
}

/**
 * Dialog to change the color using the red, green, and blue components.
 */
class ColorEdit extends JDialog
        implements ActionListener
{
    ColorScrollbar red, green, blue;
    JLabel redlabel, greenlabel, bluelabel;
    Color color, colorold;
    JPanel colorpanel;
    String name;
    ColorEditListener coloreditlistener;

    public ColorEdit (Frame frame, ColorEditListener cl, Color c)
    {
        super(frame, "Edit Color", false);
        coloreditlistener = cl;
        colorold = color = c;

        // Panel for the scrollbars:
        JPanel center = new JPanel();
        center.setLayout(new GridLayout(0, 1));
        center.add(red = new ColorScrollbar(this, "Red", color.getRed()));
        center.add(green = new ColorScrollbar(this, "Green", color.getGreen()));
        center.add(blue = new ColorScrollbar(this, "Blue", color.getBlue()));
        add("Center", center);

        // Panel for the buttons:
        Panel buttons = new Panel();

        // Buttons
        JButton b;
        buttons.add(b = new JButton("OK"));
        b.addActionListener(this);
        buttons.add(b = new JButton("Cancel"));
        b.addActionListener(this);
        add("South", buttons);

        // Panel for the color display
        colorpanel = new JPanel();
        colorpanel.add(new JLabel("Your Color"));
        colorpanel.setBackground(color);
        add("North", colorpanel);

        pack();
        setVisible(true);
    }

    @Override
    public void actionPerformed (ActionEvent e)
    {
        if (e.getActionCommand().equals("Cancel"))
        {
            color = colorold;
            tell(); // reset old color
        }
        coloreditlistener.close();
        dispose();
    }

    public void setcolor() // notifies the listener
    {
        color = new Color(red.getValue(), green.getValue(), blue.getValue());
        colorpanel.setBackground(color);
        colorpanel.repaint(); // Redraws the color display
        tell();
    }

    void tell() // Notification to listener
    {
        coloreditlistener.setColor(color);
    }
}

class TestFrame extends Frame
        implements ColorEditListener
{
    ColorEdit CE = null;
    Color C;

    public TestFrame()
    {
        // Set an icon image, a 32x32 PNG file in the same folder as this class.
        setIconImage(new javax.swing.ImageIcon(
                getClass().getResource("hearts32.png")).getImage());

        // React to the closing in another way than by setDefaultAction
        addWindowListener(
                new WindowAdapter()
                {
                    @Override
                    public void windowClosing(WindowEvent e)
                    {
                        dispose();
                        System.exit(0);
                    }
                });

        // Add to mouse clicks into the window.
        addMouseListener(
                new MouseAdapter()
                {
                    @Override
                    public void mousePressed (MouseEvent e)
                    {
                        coloredit();
                    }
                });

        // Starting with the default color.
        C = UIManager.getColor("Panel.background");

        setSize(400, 400);
        setLocationRelativeTo(null);
        setVisible(true);
    }

    @Override
    public void paint (Graphics g)
    {
        g.setColor(C);
        g.fillRect(0, 0, getSize().width - 1, getSize().height - 1);
    }

    @Override
    public void update (Graphics g)
    {
        paint(g);
    }

    public void coloredit ()
    {
        // only if no dialogue is open yet!
        if (CE == null)
            CE = new ColorEdit(this, this, C);
        CE.setLocationRelativeTo(this);
    }

    // Methods of ColorEditListener

    @Override
    public void setColor (Color c)
    {
        C = c;
        repaint();
    }

    @Override
    public void close()
    {
        CE = null;
    }
}

public class Test
{
    public static void main (String args[])
    {
        new TestFrame();
    }
}